CZ:Technical/Clone/How to set up a CZ clone on Ubuntu
This page provides instructions describing how to set up a Citizendium clone on the Ubuntu operating system. Creating a CZ clone is useful for a number of purposes, including:
- Storing a local copy of Citizendium on a lap-top or other device so articles are accessible when there is no available network connection.
- Creating a local copy of Citizendium for the purpose of fixing bugs in the modified version of Mediawiki that forms its software base or developing extensions to that code.
Installing the necessary software infrastructure
CZ is implemented by a modified version of the Mediawiki software. This software relies on several software components that underly its operation, specifically:
- PHP - an object-oriented interpreted language. Mediawiki is written in PHP and its software modules execute when accessed through a web server.
- Apache2 - an open source industrial grade web server.
- Postgres - an open source industrial grade database system.
Together, these are frequently referred to as a LAPP stack (Linux Apache2 Postgres PHP stack). Note that many Mediawiki implementations use the MySQL database system, rather than Postgres. While it might be possible to install Citizendium's wiki content using a MySQL database, doing so would represent experimental development. This how-to presumes the installer uses Postgres.
There are a number of different platforms that support a LAPP stack and potentially any of them could be used to support a CZ clone, While these instructions describe how to set up a CZ clone on the Ubuntu operating system, it is possible to install CZ's software on other Linux platforms and even on other operating systems (e.g., Mac OS X, Windows). There are instructions for setting up a CZ clone on CentOS 5. However, CentOS is expert friendly and not a good choice for those without experience on that Linux variant. Those interested in using using a OS platform other than Ubuntu or CentOS 5 will have to do the research necessary to accomplish that.
While these instructions assume the software is installed on Ubuntu Linux, they should also work on any other Debian Linux variant. The instructions for Ubuntu given here have been tested on a fresh install of Hardy Heron (8.04) with software updated to that available on 12/14/2009. The kernel was Linux version 2.6.24-16-generic.
Installing the LAPP stack
It is common to refer to the Apache, Postgres and PHP software infrastructure as a LAPP stack (i.e., a Linux Apache Postgres PHP stack). An infrastructure using MySQL instead of Postgres is referred to as a LAMP stack). These instructions assume the reader is using Ubuntu, specifically Ubuntu Hardy Heron (8.04LTS). Furthermore, they assume the Ubuntu installation is standard (i.e., it includes all of the standard application software components).
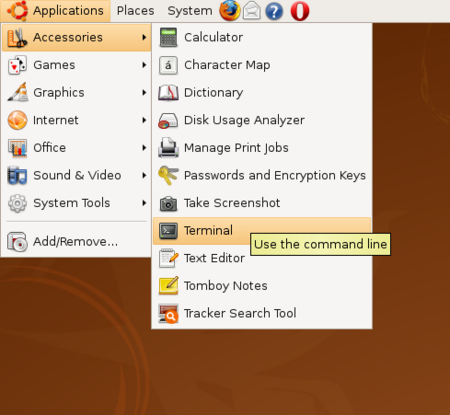
Many of the following instructions direct the installer to enter a command into a terminal window. On Ubuntu a terminal window is created as follows:
Bringing your Ubuntu installation software up to date
Before installing your CZ clone, it is important to bring your Ubuntu software up to date. Generally, soon after you boot your system, if there are software updates available, a notice window will pop-up informing you of this. However, this may not happen immediately for a fresh install. In that case, you can force a software update by selecting System at the top of your desktop, then select Administration and finally Update Manager. This will start the sequence that queries the existing software repositories to see if your software is up to date. If not, you will be asked whether you wish to do so. You should answer in the affirmative and update your software before moving on to the next steps.
Updating the apt-get database
To ensure the LAPP stack installation uses the most up-to-date software, the installer should first update the apt-get database using the following command at a terminal command-line prompt:
sudo apt-get update
Install Postgres, Apache2 and PHP
After updating the apt-get database, install postgres.
sudo apt-get install postgresql-8.3 php5-pgsql
Then install the Apache2 web server and PHP.
sudo apt-get install apache2 libapache2-mod-php5 php5-gd php5-cli
Configuring the LAPP stack
Once the LAPP stack is installed, the installer must configure it.
Configure Postgres
The first thing to do is assign a password to the postgres user of the postgres database. This step may be somewhat confusing to a novice user of postgres, so some explanation is in order. On the operating system that runs postgres is a user named postgres. This user is also listed as a Login Role for the postgres database system. The next step uses a feature of postgres that stipulates if you access the database (through the utility psql) as a particular user, you are automatically logged into postgres as that user. So, the first step is to use sudo to login as root and then change the user identity with the -u parameter. The command executed by sudo will use psql to connect to the postgres database (which, while having the same name, is different than the postgres Login Role). Once psql is connected to the postgres database using the Login Role postgres, it is possible to change the password for (the Login Role) postgres. Execute the following command at a terminal prompt:
sudo -u postgres psql postgres
This should result in a welcome message, followed by some command hints and then followed by the prompt:
postgres=#
At this prompt type:
\password
psql will prompt you for a password and then prompt you to reenter it (remember this password, because you will need it later). If you successfully enter the same password twice, psql returns a new prompt. Type "\q" (without the quotes), which should return you to a Ubuntu command prompt.
The above instructions use the term postgres in three different ways. There is the postgres database system, which is the software that implements postgres. There is the postgres database, which is a collection of tables managed by the postgres database system. Finally, there is the postgres Login Role, which is an identity used by the postgres database system to make access control decisions. It is necessary to keep these distinctions in mind. Later in these configuration instructions, we willl create a cz Login Role and a cz database.
For the novice, using postgres can be a frustrating experience. The main command line utility for interacting with postgres is "psql". Psql has two sets of commands. The first always begin with the character '\' (the backslash, not the slash). The second are SQL commands. Frequently, when using the second category of commands, a new user fails to enter the required semicolon (";") at the end. (The semicolon is not used at the end of the first category of commands). After entering an SQL command, psql returns a prompt and the user thinks the command has been executed. However, it hasn't. A semicolon must be entered (it can be entered after the command on the subsequent prompt). To make things even more confusing, psql uses a "query buffer". This concatenates all input until the requisite semicolon is typed. This also makes things difficult for the novice user, since many times he/she will type multiple commands and then remember to type one with a semicolon. This almost always results in an error. It is good practice to clean out the query buffer using the command "\r" (without the quotes) before entering a new SQL command. It is recommended that those unfamiliar with psql read this good tutorial on its use.
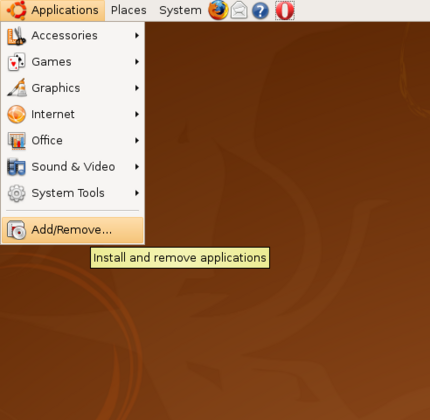
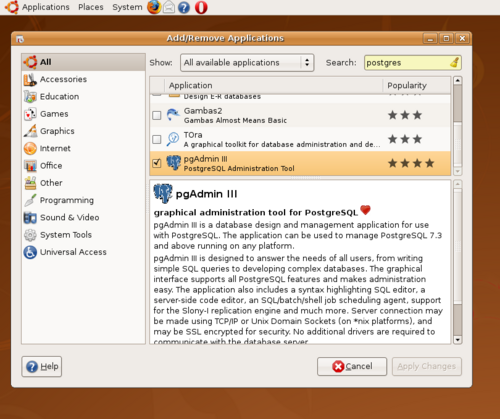
A GUI for accessing postgress databases, pgAdmin III, can help the novice user avoid many of the frustrations experienced when using psql. To install pgAdmin III, use Ubuntu's Add/Remove application facility. This is accessed by clicking at the top left of the desktop on the "Applications" tag (Postgres Figure 1). Select All available applications in the Show drop down menu and type postgres in the Search box (Postgres Figure 2). When the search finishes, scroll down to the bottom and select the pgAdmin III application by checking the box to the left. Then click on Apply Changes. This will install pgAdmin III on your system. (The system may request you to enable community applications. If so, click "Enable"). You will also have to enter your superuser password in a prompt window.
|
Postgres Figure 1 |
Postgres Figure 2 |
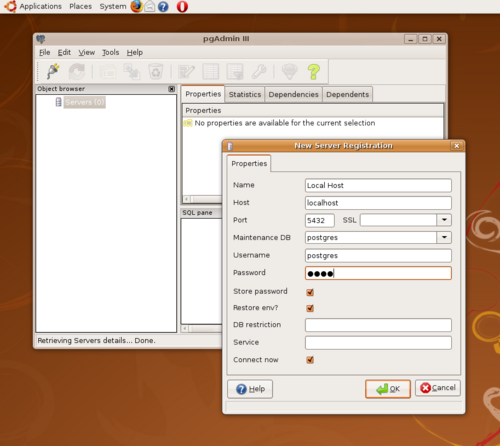
Once installed, pgAdmin III requires configuration. Start pgAdmin III (it should appear in the Applications menu under System Tools). The application window appears. In the left window pane is an icon labeled Servers(0). It is necessary to connect to a postgres server in order for the tool to operate. Under the File menu, select Add Server. A New Server Registration window pops up (Postgres Figure 3).
We are going to use the tool to connect to the database server on the local system. So, fill in the Name field with an appropriate name (e.g., Local Host) and fill in the Host field with the value localhost. The Username field is filled in by default to postgres. We will use this identity to access the database system until we have other Login Roles established. So, it is necessary to fill in the password created for the postgres Login Identity previously. Once this is filled in (leave all other selections at their default values), the OK button becomes active. Click it. You may see a hint displayed. If you find these annoying, there is a check box that turns them off. The result of this is a new entry under Servers(1) appears called Local Host (note the number of servers has changed from 0 to 1). Click on the + sign to the left of Local Host and a number of other labels appear.
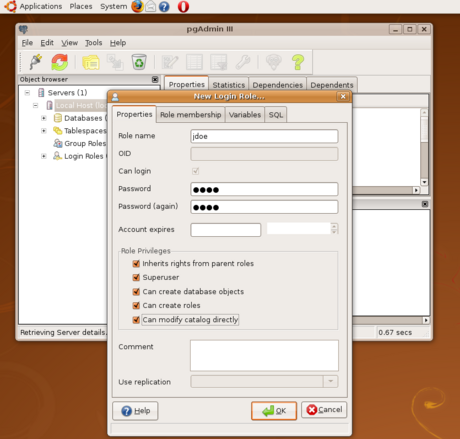
We will use pgAdmin III to create two new Login Roles. The first is a role corresponding to your user name. This will allow you to use psql from your user account without specifying a username and password. Click on Local Host so it is highlighed and then click on the Edit menu and select New Object. A pop out menu appears to the right. Select New Login Role.... Fill in the form as follows (Postgres Figure 4):
- Role name - your user name on the system. For example if you login to Ubuntu as jdoe, fill in jdoe into the Role name field.
- Password - enter a password for your postgres Login Role (this is a postgres specific password. Normally you would not use your Ubuntu password.).
- Password (again) - enter the same password.
- Role Privileges - click all of the boxes. This gives you all privileges for database administration.
Click on OK.
|
Postgres Figure 3 |
Postgres Figure 4 |
To check that you successfully created a Login Role with the same username as your Ubunutu name, type the following command at a terminal window prompt (don't close pgAdmin III. We will use it again below):
psql postgres
This should result in the postgres welcome message, command hints and then the prompt: postgres=>. Type \q to exit psql (if you wish, you can stay in psql rather than quitting, since we will return to it after some more work in pgAdmin III).
Going back to pgAdmin III, we will create another Login Role as well as a new database. To create the Login Role follow the steps given above, except use the Role Name cz and leave the password fields blank. While it is unnecessary to give the cz Login Role all privileges, this clone of CZ will be used by only you and it is therefore convenient to do so. If you were creating an installation of CZ that would be accessed by others, you would spend much more time configuring it so it is secure. How to configure a CZ installation so it is secure in a multi-user environment is outside the scope of these instructions.
We have to modify the cz role and using psql is the easiest way to do so. In a terminal window at a prompt type:
psql postgres
This should result in the postgres welcome message, command hints and then the prompt: postgres=#. Now enter the following information at the postgres prompt. (note: you can simply copy and past the information below into the terminal window).
ALTER ROLE cz SET "TimeZone" TO 'GMT';
ALTER ROLE cz SET search_path TO mediawiki, public;
ALTER ROLE cz SET "DateStyle" TO ISO, YMD;
ALTER ROLE cz SET client_min_messages TO 'error';
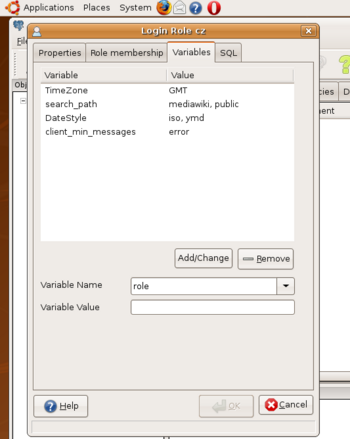
If you enter this information one line at a time, you will have to type a return each time (don't forget the semicolon after each line). If you copy and paste the information, you will need to type a return after the last line. As each line is executed, psql will return ALTER ROLE. To check that these commands executed correctly, use pgAdmin III to navigate to the cz Login Role (i.e, expand the + sign next to Login Roles). Double click on cz. A pop-up window should appear with the information for cz. Select the Variables tab and the variable values set by psql should display (Postgres Figure 5). You may need to refresh the information displayed by pgAdmin III by selecting Refresh from the View menu. Exit psql by typing "\q".
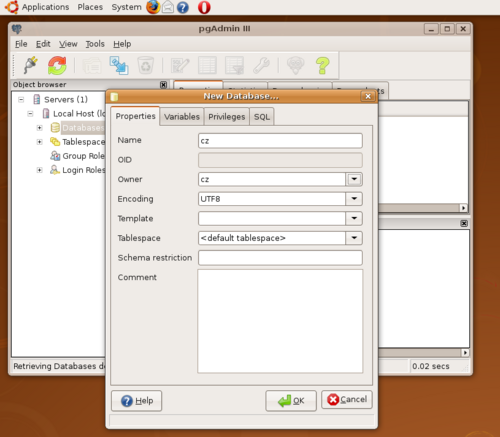
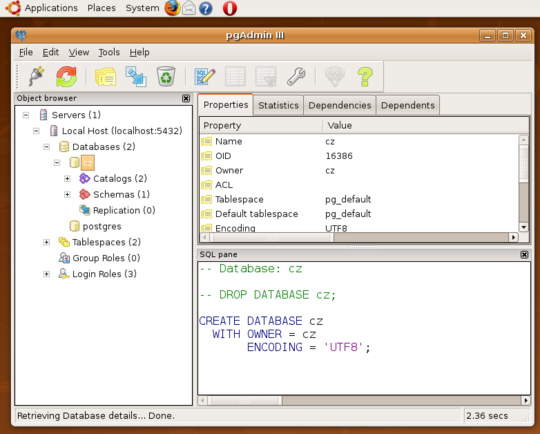
Now that a cz Login Role is established with the correct initialization information, it is possible to create a cz database. In the main pgAdmin III window click on Databases so it is highlighted and either right click on it and select New Database or from the Edit Menu select New Database (in some versions of pgAdmin III New Database is a selection in the New Object submenu). Fill in the Name field with cz. Select cz using the right hand down-arrow of the Owner field (Postgres Figure 6). Click OK. The Databases field should change from Databases(1) to Databases(2). Click on the + sign to the left of the Databases field and two databases should be displayed: 1) postgres, and 2) cz (Postgres Figure 7).
|
Postgres Figure 5 |
Postgres Figure 6 |
|
Postgres Figure 7 |
There is one last bit of configuration necessary to set up postgres as the wiki's backend database server. We have to modify the postgres authentication configuration data so it trusts commands executed from the local server. In a terminal window execute:
xhost +
sudo su - postgres
cd /etc/postgresql/8.3/main
gedit pg_hba.conf &
The first command disables X11 access control so the postgres user can access the display. If you get the message:
cannot open display:
then you need to set the DISPLAY environmental variable for the postgres user and re-execute the gedit command. That is:
DISPLAY=:0.0
export DISPLAY
gedit pg_hba.conf &
An edit window should appear. Scroll to the end of the file and find the entry with the comment "local" is for Unix domain socket connections only. The next entries control access when connections to the postgres server come from the local host. Copy the text below and replace the corresponding text. The entry should now look like the following:
# "local" is for Unix domain socket connections only
#local   all         all                               ident sameuser
local   all         all 				trust
# IPv4 local connections:
#host    all         all         127.0.0.1/32          md5
host    all         all         127.0.0.1/32          trust
# IPv6 local connections:
#host    all         all         ::1/128               md5
host    all         all         ::1/128          trust
The change comprising the last three lines is only necessary if the system is using IPv6 addressing.
Save the file and exit the editor.
Close pgAdmin III, if it is open. This is an important principle. Whenever you restart the postgres server make sure pgAdmin III is closed.
Now restart the postgres server with the following commands:
exit
sudo /etc/init.d/postgresql-8.3 restart
This completes the configuration of postgres. We will return to postgres when we cover how to create the CZ clone database.
Configure Apache2
Configuring the apache2 web server requires less sophisticated tools than those used to configure postgres. Basically, a text editor is all that is required. These instructions use gedit, which is a nice GUI editor that comes pre-configued on Ubunutu.
Configuration of the original apache server required editing one large file (httpd.conf). Fortunately, the apache2 server software has separated the configuration information into several files, which makes configuration much easier. On Ubuntu, the main configuration file is located in /etc/apache2. It is named apache2.conf. There is no need to edit this file when setting up a CZ clone. In fact, no configuration of the apache2 server is necessary to enable the LAPP stack. To test that the apache2 server and PHP are correctly installed, in a terminal window execute:
cd /var/www
sudo gedit phpinfo.php
This will pop an edit window. Enter the following text into the file:
<?php
phpinfo();
?>
Then save the file and exit the editor. Now restart the apache2 server to ensure it has read the installed configuration files:
sudo apache2ctl restart
In a web browser, create a new tab or a new window. In the url field at the top enter:
http://localhost/phpinfo.php
If the apache2 server and PHP are correctly installed, a page of information about PHP should display. At the top will be the PHP Version and in the subsequent graphical boxes will be information about PHP and the PHP extensions installed. It is useful to keep the phpinfo.php file in this location because occasionally it is helpful to test the apache2/PHP installation to ensure it retains integrity.
Some additional configuration of the apache2 server is necessary to utilize the CZ software that implements the wiki. There are two ways to configure the apache2 server for the CZ clone. One way is to assume there is only one copy of the CZ software on the machine. This is normally true for those who are cloning CZ for personal use. The other way is to assume multiple copies of the CZ software exist on the machine. This is normally the case if the CZ clone is used for software development. While setting up the machine for multiple copies of the CZ software is unnecessary for a local use clone, it really doesn't introduce any overhead to do so. Consequently, these instructions describe how to set up the apache2 server to access more than one copy of the CZ software.
The CZ software will be stored in subdirectories of /usr/local/src. The first step is to cd to that directory and create a subdirectory called mediawiki. Change the permissions on mediawiki to 777 (i.e., in /usr/local/src execute sudo chmod 777 mediawiki). In a production environment, the adminstrator would use more careful access control permissions. However, since this CZ clone is intended for local use, making the software world r/w is an acceptable configuration strategy. Change directories to mediawiki and create a CZ_1_13_2 subdirectory. Also make this directory world r/w. The commands are:
cd /usr/local/src
sudo mkdir mediawiki
sudo chmod 777 mediawiki
cd mediawiki
sudo mkdir CZ_1_13_2
sudo chmod 777 CZ_1_13_2
If the CZ clone is used for development purposes, the developer would create additional subdirectories of the /usr/local/src/mediawiki directory to hold different versions of the CZ software. In fact, it is possible to host copies of the non-modified mediawiki software by downloading them into subdirectories of mediawiki. For example, if it is desirable to download a copy of the mediawiki software on which CZ is based, the developer could create a subdirectory of mediawiki, say MW_1_13_2, and use it to hold the non-modified version.
Once this directory structure is created, it is possible to make the changes to the apache2 configuration information necessary to support the CZ software. In a terminal window exectute:
cd /etc/apache2/sites-enabled
sudo gedit 000-default
This will open an edit window displaying the contents of the sites-enabled file. At the end of this file right before the </VirtualHost> delimiter, enter the following information:
    Alias /mediawiki/ "/usr/local/src/mediawiki/"
    <Directory "/usr/local/src/mediawiki/">
		Options FollowSymLinks
		AllowOverride None
    </Directory>

    Alias /CZ_1_13_2 "/usr/local/src/mediawiki/CZ_1_13_2/phase3/index.php"
After doing so the end of the file should contain the following text:
    Alias /mediawiki/ "/usr/local/src/mediawiki/"
    <Directory "/usr/local/src/mediawiki/">
		Options FollowSymLinks
		AllowOverride None
    </Directory>

    Alias /CZ_1_13_2 "/usr/local/src/mediawiki/CZ_1_13_2/phase3/index.php"

</VirtualHost>
Save the file, close the editor and restart the apache2 server by executing:
sudo apache2ctl restart
We can't test whether the apache2 server properly executes the CZ software because that software isn't installed yet. However, we can test the configuration changes we just made. In a terminal window type:
sudo su
cd /usr/local/src/mediawiki/CZ_1_13_2
mkdir phase3
chmod 777 phase3
cd phase3
cp /var/www/phpinfo.php .
mv phpinfo.php index.php
chmod 777 index.php
exit
The first command moves the terminal session to the root identity. We do this because there are a lot of commands that require root access and typing sudo before each is inefficient. The last command exit takes the session back to your Ubunutu identity.
These commands make a copy of the phpinfo.php file in /usr/local/src/mediawiki/CZ_1_13_2/phase3 and rename it index.php. When we install the CZ software we will have to remove this file before loading it, since there is already an index.php file in the CZ software distribution.
Now we are prepared to test the new apache2 server configuration. Open a browser and either open a new tab or a new browser window. In the URL field enter:
http://localhost/mediawiki/CZ_1_13_2/phase3/index.php
The same PHP configuration information should appear as before. Now enter in the URL field:
http://localhost/CZ_1_13_2
Again the PHP configuration information should appear. If either of these tests fail, recheck the edits and the directory structure created above. In the latter case, the directories /usr/local/src/mediawiki, /usr/local/src/mediawiki/CZ_1_13_2 and /usr/local/src/mediawiki/CZ_1_13_2/phase3 should exist with 777 permissions.
Installing the CZ wiki software
Download the CZ wiki software
Installing the CZ wiki software requires access to the main CZ repository. In this repository is stored various versions of the software including the currently deployed version and others undergoing development. The version control system used to manage these versions is Subversion. We must install the Subversion software in order to access the repository.
Create a terminal window and enter the following command:
sudo apt-get install subversion
Once the installation completes, we can download the current CZ software release. But, first we have to clean up some detritus left from testing the apache2 configuration. Execute the following commands in a terminal window:
sudo su
cd /usr/local/src/mediawiki/CZ_1_13_2
rm -fr phase3
exit
This removes the phase3 directory and everything in it. Now we have to find out which release version we will checkout. Execute:
svn list http://test.citizendium.org/czrepo/tags
The result is a list of releases for the CZ software. These instructions assume the latest version is called CZ_1_13_2_1.
The next step is to checkout this version. For those new to version control, a checkout from a repository makes a local copy of whatever branch is specified. This local copy retains information about where it comes from in the repository, but the repository itself keeps no state about the local copy. Consequently, you can do anything you want with the local copy, even delete it. The repository is unaware of these changes until you attempt to check in the local copy.
To checkout CZ_1_13_2_1 into the directory CZ_1_13_2 (which is where will configure the apache2 server to find it), execute:
cd /usr/local/src/mediawiki
svn checkout http://test.citizendium.org/czrepo/tags/CZ_1_13_2_1 CZ_1_13_2
The result of this command is a very large number of lines starting with the letter A (which stands for Add). After the command completes, there is a copy of the latest CZ released software in /usr/src/local/mediawiki/CZ_1_13_2.
Setting up the CZ database
The next step is to create the database schema. In an unmodified version of the mediawiki software the schema is created using a utility called update.php. However, CZ runs a modified version of the mediawiki software and so this utility doesn't correctly setup the database. So, we must use psql to import the schema.
The directory /usr/src/local/mediawiki/CZ_1_13_2 has two subdirectories: 1) database, and 2) phase3. The latter contains the PHP modules that implement the wiki. The former contains information specific to the wiki database. In particular, it contains a dump of the CZ database schema. We will use psql to import this into the cz database. (Note: Before executing the following commands, make sure pgAdmin III is not running. Accessing postgres from pgAdmin III and psql simultaneously can cause postgres to exit with a failure message).
In a terminal window execute:
cd /usr/local/src/mediawiki/CZ_1_13_2/database
psql -d cz -U cz -f schema_1_13_2.pg
If an error occurs with the following text:
FATAL: Ident authentication failed for user cz
then you haven't correctly changed the file pg_hba.conf. Go back and ensure that both local and host entries are specified as trust.
Before configuring the CZ wiki software, we will make one modification to the CZ database. It isn't clear why this change is necessary, but if it isn't executed, the database import will not work. Furthermore, this action creates a dummy user with a user id of 0. A real user cannot have this user id, since the software will not allow such a user to login.
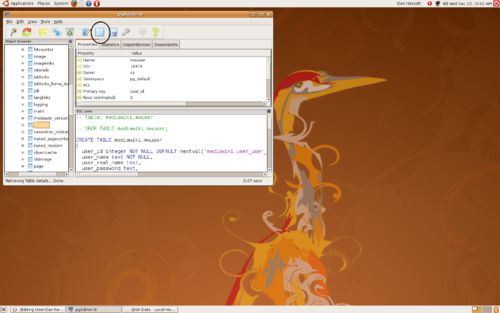
Start pgAdmin III. Double click the localhost icon and if they are not already expanded, click on the + button to the left of the cz icon and then on the + button to the left of the Schemas icon and then on the + button to the left of the mediawiki icon. Under mediawiki click on the + button to the left of the Tables icon. Scroll down to the mwuser entry. Single click mwuser and then click on the icon that looks like a table at the top of the window shown in Postgres Figure 8.
|
Postgres Figure 8 |
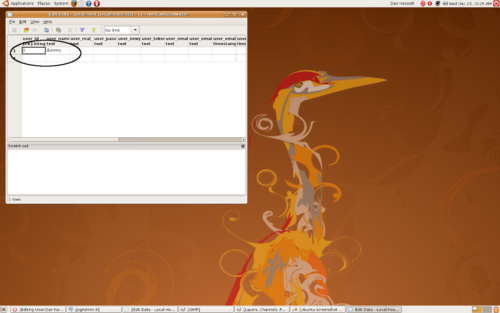
Postgres Figure 9 |
In the first row under user_id, enter the integer 0. In the next column, user_name, enter the text "dummy" (without the quotes). Select File in the upper left-hand corner and then select save. The result should look like Postgres Figure 9. These actions create a dummy user that cannot be used to login to the wiki, since it has no password associated with it.
In order to adjust the wiki state for the dummy user, we must now make a change to a database sequence variable. This category of database information provides consecutive values that aid in labeling other database data. Click the - to the left of Tables and then click the + to the left of Sequences. Scroll down to user_user_id_seq and double click it. Change current value from 0 to 1 and click OK. Close pgAdmin III.
Configuring the CZ wiki software
Most configuration of the CZ wiki software occurs through edits to the file LocalSettings.php. In a non-modified version of the Mediawiki (MW) software, after an initial software install using Subversion, the installer accesses the wiki through a web browser and a special PHP routine guides him/her through the steps necessary to achieve an intial configuration. However, since the CZ wiki uses a different database schema than MW, the CZ software distribution comes with a copy of LocalSettings.php that is already properly configured. It is only necessary to get a copy of LocalSettings.php into the phase3 directory of the CZ software distribution. In a terminal window execute:
cd /usr/local/src/mediawiki/CZ_1_13_2/phase3
cp config/LocalSettings.php .
Now, open a browser window and in the URL field type:
http://localhost/CZ_1_13_2
The wiki main page should appear. If so, congratulations! You have successfully installed the CZ wiki software. If you wish, you can bookmark this URL and save it under a more informative title, such as "CZ clone" or "Local CZ clone". If the main page did not appear, go back and review the instructions in this section to ensure you executed them correctly.
Establishing the first user
User registration in a CZ wiki requires an administrator to approve them. This is to ensure they are using the real names and they provide a short description of themselves that goes on their user page. However, when the software is first installed, no users exist (ignoring the dummy user, which has no login capability). So, the first user is established using a one-off procedure. This involves using a utility in the maintenance directory of the wiki software. This utility installs a user with specified privileges.
In a terminal window execute:
cd /usr/local/src/mediawiki/CZ_1_13_2/phase3/maintenance
php createAndPromote.php --bureaucrat Wikiadmin Wikiadminpw
For "Wikiadminpw" you can substitute any password you wish. If the createAndPromote call exits with the error:
cz: Creating and promoting User:Wikiadmin...PHP Warning: pg_query(): Query failed: ERROR: duplicate key value violates unique constraint "mwuser_pkey" in /usr/local/src/mediawiki/CZ_1_13_2/phase3/includes/db/DatabasePostgres.php on line 552
you forgot to change the current value of user_user_id_seq to 1. If you execute the call again it should work.
Post wiki software installation and configuration
There is some software installation and configuration work necessary to provide optional, but commonly provided features for the CZ clone.
Configuring local email
In order to logon to your CZ clone, your account must have a valid email address configured. The way the CZ software judges that this condition is met is to send you a confirmation email when you first register. This applies to all users, including the Wikiadmin user created using createAndPromote.php. So, in order to continue, we must first configure email. Normally, email is configured by a system admin to allow users to send and receive messages from other users on the internet. If your system already is configured to do this, nothing else is required. Skip the next sub-section and proceed to Setting up your email address. Otherwise, you must complete the steps in the next section.
Setting up local host email
Sending and receiving email on your local system requires the installation of a Message Transfer Agent. Since this is a clone, we will enable only local email and use exim4, a small, efficient MTA. In a terminal window execute:
sudo aptitude install postfix
Answer y at the appropriate point.
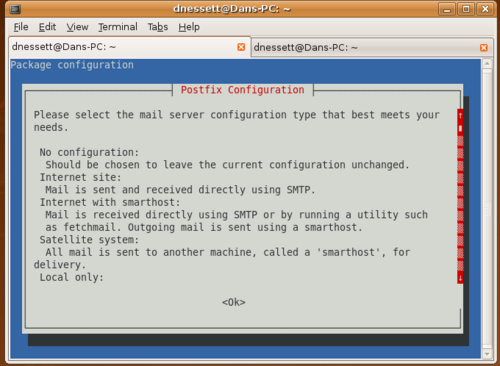
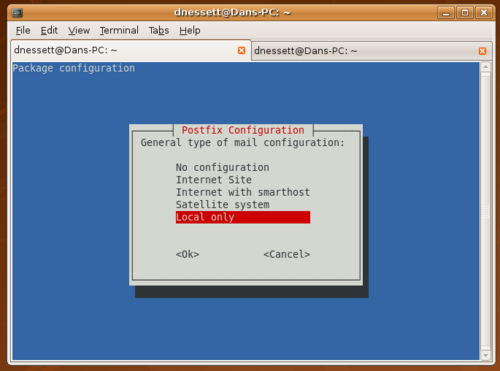
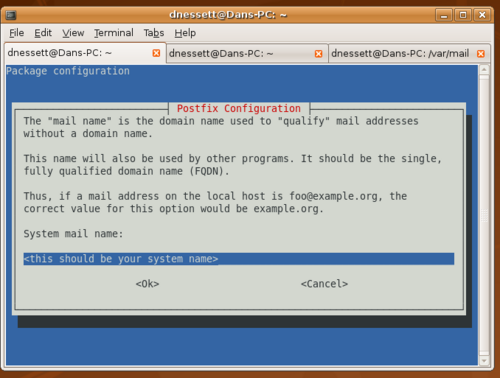
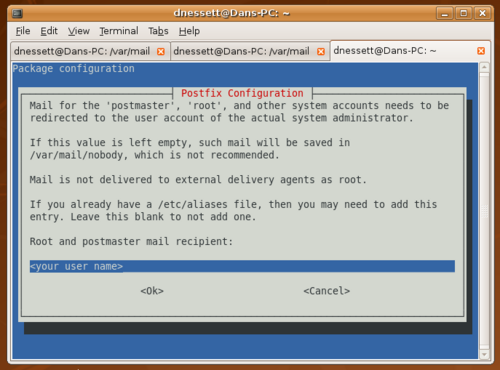
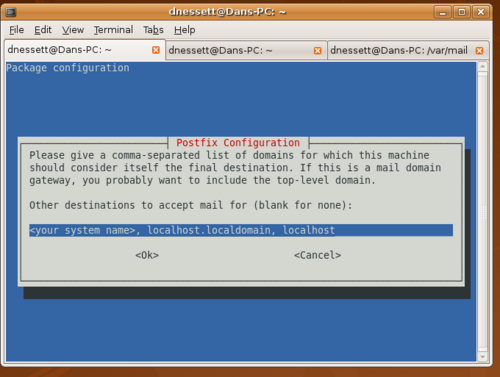
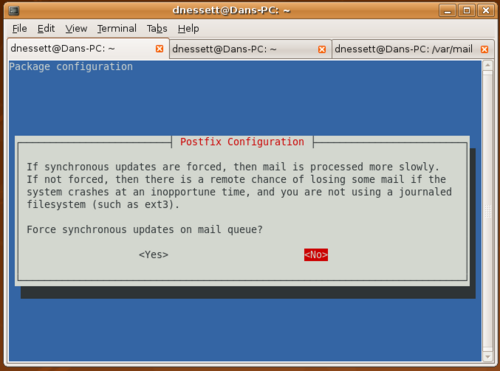
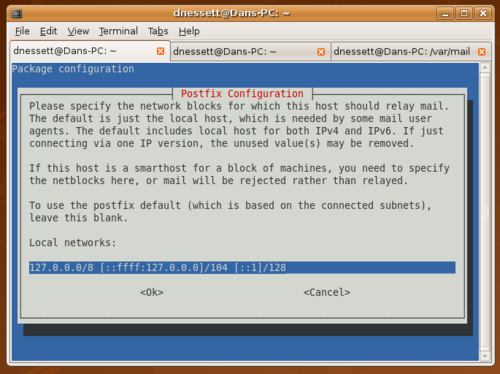
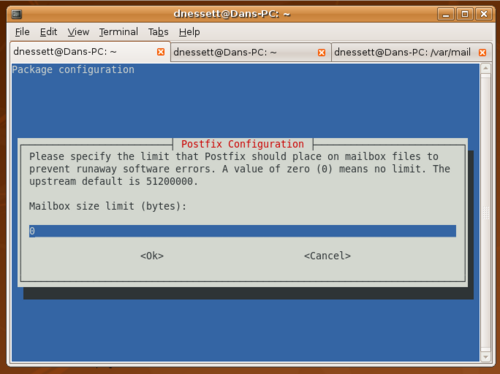
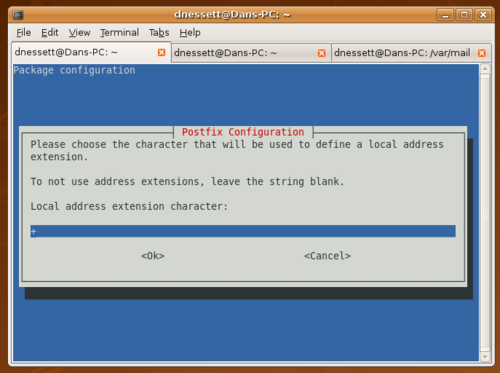
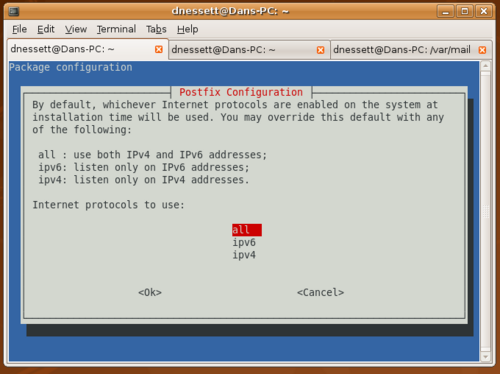
After aptitude installs postfix, it automatically starts up the postfix configuration dialog. This consists of several windows that display within the terminal window. You must use keystrokes to navigate through this dialog. The tab character moves you to the next choice and the enter character selects a choice. The default configuration only leads you through the first few windows illustrated below. So, after the default configuration completes, you should reconfigure Postfix by executing the following command:
sudo dpkg-reconfigure postfix
Use the values illustrated in the figures to configure Postfix. Generally, always accept a default value unless the figure below indicates differently:
|
Postfix Figure 1 |
Postfix Figure 2 |
|
Postfix Figure 3 |
Postfix Figure 4 |
|
Postfix Figure 5 |
Postfix Figure 6 |
|
Postfix Figure 7 |
Postfix Figure 8 |
|
Postfix Figure 9 |
Postfix Figure 10 |
To test the installation, execute:
telnet localhost smtp
The following response should appear:
Trying 127.0.0.1...
Connected to localhost.
Escape character is '^]'.
220 <your system name> ESMTP Postfix (Ubuntu)
Now type the following (enter each command on a single line and the type Enter. After each command Postfix will respond. The commands with their response are shown below):
ehlo host
mail from: <type your user name here>
rcpt to: <again type your username here>
data
test
.
quit
The full sequence of commands and Postfix responses is as follows:
telnet localhost smtp
Trying 127.0.0.1...
Connected to localhost.
Escape character is '^]'.
220 <your machine name> ESMTP Postfix (Ubuntu)
ehlo host
250-<your machine name>
250-PIPELINING
250-SIZE 10240000
250-VRFY
250-ETRN
250-STARTTLS
250-ENHANCEDSTATUSCODES
250-8BITMIME
250 DSN
mail from: <your user name>
250 2.1.0 Ok
rcpt to: <your user name>
250 2.1.5 Ok
data
354 End data with <CR><LF>.<CR><LF>
test
.
250 2.0.0 Ok: queued as <some character string>
quit
221 2.0.0 Bye
To ensure everything worked correctly, execute:
cd /var/mail
ls
The ls command should display a file with your user name, say jdoe.
Now execute:
cat jdoe
This should result in the following (assuming your machine name is Jdoes-PC. Obviously, the date, time and message id will be different):
From jdoe@Jdoes-PC  Wed Jan 13 11:09:26 2010
Return-Path: <jdoe@Jdoes-PC>
X-Original-To: jdoe
Delivered-To: jdoe@Jdoes-PC
Received: from host (localhost [127.0.0.1])
	by Jdoes-PC (Postfix) with ESMTP id C77A2EFB19
	for <jdoe>; Wed, 13 Jan 2010 11:09:10 -0800 (PST)
Message-Id: <20100113190921.C77A2EFB19@Jdoes-PC>
Date: Wed, 13 Jan 2010 11:09:10 -0800 (PST)
From: jdoe@Jdoes-PC
To: undisclosed-recipients:;

test
Setting up the email client
Now that local email is available, we must configure an program to receive it. We will use Evolution, the standard Gnome email reader. From the Applications menu at the top of the desktop, select Internet and then Evolution Mail.
From the Welcome page click Forward and Forward again. The Identity page should display. In the Email address window type <your username on the local system>@localhost. For example, if your username on the system is jdoe, then enter jdoe@localhost. Click the Forward button. The next window should be labeled Receiving Email. From the pop-down menu labeled Server Type select Standard Unix mbox spool file. Click the Configuration pop-down menu, click File System in the left column and then double click var, then mail, and then the file with the same name as your user name. Click Forward at the bottom of the window and then click Forward. In the next (Receiving Options) window, select how often you want Evolution to check for email. Then click Forward. In the Sending Email window choose Sendmail from the pop-down menu. Then click Forward. In the Account Management window select the name that you want to appear for this account in Evolution. Then click Forward. In the Timezone window select your time zone. Then click Forward and Apply.
Evolution should launch and in the left-hand column will be the name you chose in the Account Management window. You should be able to send and receive email from this account.
Configuring the CZ clone with your email address
If you have used the CZ wiki at Citizendium, you should already know how to configure your email address. However, for completeness this section describes that task.
Access your local CZ clone wiki (http://localhost/CZ_1_13_2) using a browser and login. At this point there is only one user - Wikiadmin, so login with this identity. When login completes, click on the Preferences tab at the top of the browser window. When your preferences window displays, enter your email address (e.g., jdoe@localhost) in the User profile field and click Save. A message informing you that a confirmation email has been sent appears. If Evolution is not running, start it (if it is running, click Send/Receive at the top left-hand corner). A confirmation email should appear in your inbox. Follow its instructions. This will confirm your email address and allow you to edit pages on your CZ clone.
Installing and configuring texvc
Mathematical equations are rendered by the utility texvc. This utility is not installed by default in a standard Ubuntu distribution, so it must be compiled and linked from source. This requires the installation of other software, some used to build texvc and some utilized by texvc during the rendering process. Once this software is installed, it is necessary to build and configure texvc itself.
Installing the software required by texvc
A standard distribution of Ubuntu 8.04 comes with both gcc and ghostscript (gs) preinstalled. This should be verifed by executing in a terminal window:
whereis gcc gs
The result of these commands should be something like:
gcc: /usr/bin/gcc /usr/lib/gcc /usr/share/man/man1/gcc.1.gz
gs: /usr/bin/gs /usr/share/man/man1/gs.1.gz
If either gcc or gs returns a null response (e.g., only gcc: or gs: with no directory information), then it is necessary to install the missing software. For example if gs is missing, execute:
sudo apt-get install gs
A similar command is used to install gcc.
Once these are installed, it is necessary to install ocaml, imagemagick and latex. This requires a large download (on the order of 125 MB) most of which is for latex data. On a high-capacity broadband connection (download bit rate of ~6 Mbps), this took about 5 minutes and the whole installation process took about 7 minutes. So, after executing the following command, be prepared to wait. In a terminal window execute:
sudo apt-get install ocaml imagemagick cjk-latex tetex-extra dvipng
As before, reply with a y when asked whether you wish to continue.
We are finally in a position to build texvc. In a terminal window execute:
cd /usr/local/src/mediawiki/CZ_1_13_2/phase3/math
make
Configuring texvc
Configuring texvc is simple, but non-intuitive. The reason is texvc is written in Ocaml and it calls various utility functions. In order for these to work correctly, certain environmental variables, permissions and directories must be properly set-up. This is the first step in getting texvc to work. In a terminal window execute:
cd /usr/local/src/mediawiki/CZ_1_13_2/phase3
chmod -R 777 images
These command set the permissions on the images directory and all its subdirectories to world read-write-execute. For a production wiki installation this is probably not recommended, but since this is your personal wiki, it shouldn't be a problem.
Next, edit LocalSettings.php (in /usr/local/src/mediawiki/CZ_1_13_2/phase3) and change $wgTexvc to equal $IP/math/texvc. That is:
$wgTexvc ="$IP/math/texvc";
To test texvc, open a browser window in your CZ clone (http://localhost/CZ_1_13_2) and create a page to edit (e.g., create a sandbox subpage for the Wikiadmin user). Edit the page and enter:
<math>\alpha^2+\beta^2=1</math>
Click Show preview. The result should be:
If the equation above appears, then texvc is working properly. However, you may get one of several errors:
Failed to parse (Cannot write to or create math temp directory):
This occurs because the math/ and tmp/ directories in phase3/images are not accessible to the apache2 server. Check to ensure you have executed the first set of commands correctly.
Another common error is:
Failed to parse (Missing texvc executable; please see math/README to configure.):
If so, make sure you have correctly modified LocalSettings.php and have saved the results.
A pernicious error is:
Failed to parse (PNG conversion failed; check for correct installation of latex, dvips, gs, and convert)
This means the CZ wiki software is having trouble calling all of the installed software necessary to render the <math> markup. Make sure you have installed all of the software specified in these instructions.
The four command sets given above properly configure a fresh Ubuntu Hardy Heron (8.04) install so texcv works. If you are installing texvc on a system that is not a fresh install, you may have to work through other configuration problems. A good source of advice for doing that is found on the Mediawiki site. Good luck!
Loading the CZ database
The preceding sections describe how to load and configure the software required to run a CZ clone. After completing this, it is necessary to load the CZ database into the clone. This populates the clone with CZ page content. Note, however, that the public content from CZ contains neither history information nor image data. So, the database loaded into the CZ clone will only contain page text content.
Loading the clone database from a CZ daily dump file
The official way to load a content database into a Mediawiki software installation uses a utility in phase3/maintenance. (Note: Before following these instructions, read the next section Loading the clone database from a postgres database dump file. Doing so may save you a great deal of time.) The first step is to obtain the data dump file. This is available at CZ:Downloads. Two files are available, which are identical, except for how they are compressed. These instructions assume the reader uses the bzip2 version. The changes necessary to use the gzip version should be obvious.
Navigate to CZ:Downloads and click on the bz2 file link. A window will appear asking you where you wish to save the file. Either save it in your home directory or save it somewhere else and move/copy it to your home directory. Then, in a terminal window, execute:
cd ~
bunzip2 cz.dump.current.xml.bz2
This command decompresses the file and changes its name to cz.dump.current.xml. Once the .xml file is available in your home directory, in a terminal window execute:
cd /usr/local/src/mediawiki/CZ_1_13_2/phase3/maintenance
php importDump.php ~/cz.dump.current.xml
Processing of the data dump file commences and importDump outputs incremental status lines. Output will look something like:
100 (1.57 pages/sec 1.57 revs/sec)
200 (1.49 pages/sec 1.49 revs/sec)
The integer at the beginning of each line specifies the number of pages importData has processed so far. When importDump completes, the clone database is available for use.
Between lines specifying the number of pages importData has processed, you may get output that looks like the following:
This is dvips(k) 5.96.1 Copyright 2007 Radical Eye Software (www.radicaleye.com)
' TeX output 2010.02.02:1219' ->
</usr/share/texmf-texlive/dvips/base/tex.pro>
</usr/share/texmf-texlive/dvips/base/texps.pro>.
</usr/share/texmf-texlive/fonts/type1/bluesky/cm/cmsy10.pfb>
</usr/share/texmf-texlive/fonts/type1/bluesky/cm/cmr12.pfb>
</usr/share/texmf-texlive/fonts/type1/bluesky/cm/cmmi12.pfb>[1]
This is normal.
After importing the data dump file, various internal database data structures will be out of date. The importDump operation creates jobs to correct this. However, normally a job is run per page access. If there are a large number of jobs (which is normally the case - sometimes in the tens of thousands), the normal page accessing activity on a clone will not provide sufficient page accesses to clear out the job queue. So, the clone maintainer must force the execution of these jobs. This is done with the maintenance script runJobs.php. Since this utility runs each job serially, running only one instance of it will still require a great deal of time to clear the job queue. Fortunately, runJobs is coded so it can be run concurrently. The following shell script runs 20 instances of runJobs:
#!/bin/bash
cd /usr/local/src/mediawiki/CZ_1_13_2/phase3/maintenance
php runJobs.php 2>&1 > ~/runJobs.log1&
php runJobs.php 2>&1 > ~/runJobs.log2&
php runJobs.php 2>&1 > ~/runJobs.log3&
php runJobs.php 2>&1 > ~/runJobs.log4&
php runJobs.php 2>&1 > ~/runJobs.log5&
php runJobs.php 2>&1 > ~/runJobs.log6&
php runJobs.php 2>&1 > ~/runJobs.log7&
php runJobs.php 2>&1 > ~/runJobs.log8&
php runJobs.php 2>&1 > ~/runJobs.log9&
php runJobs.php 2>&1 > ~/runJobs.log10&
php runJobs.php 2>&1 > ~/runJobs.log11&
php runJobs.php 2>&1 > ~/runJobs.log12&
php runJobs.php 2>&1 > ~/runJobs.log13&
php runJobs.php 2>&1 > ~/runJobs.log14&
php runJobs.php 2>&1 > ~/runJobs.log15&
php runJobs.php 2>&1 > ~/runJobs.log16&
php runJobs.php 2>&1 > ~/runJobs.log17&
php runJobs.php 2>&1 > ~/runJobs.log18&
php runJobs.php 2>&1 > ~/runJobs.log19&
php runJobs.php 2>&1 > ~/runJobs.log20&
wait
This script creates 20 log files in the user's home page that document the jobs activity.
After running runJobs, the statistics page will be out of date. To update it, execute:
cd /usr/local/src/mediawiki/CZ_1_13_2/phase3/maintenance
php initStats.php
Loading the clone database from a postgres database dump file
Loading the clone database from a CZ daily dump file is extremely slow. On a dual 1.8 GHz processor with 4 GB of memory, loading one of the CZ daily dump files from December 2009 took 80 hours (that is no misprint: ~3.25 days!). Fortunately, there is a way to work around this problem.
Once the daily data dump file is loaded into the CZ clone, it is possible to dump the postgres cz database and make it available. Using the postgres database dump reduces the time to load the CZ clone database from 80 hours to a little over 21 minutes (for the postgres database of 01-18-2010 on a dual 1.8 GHz processor with 4 GB of memory).
First, we need to download the most recent public postgres database dump. Click on the following link — postgres database dumps. Select the most recent dump file. Files are named cz_db_dump_<date>.gz, where <date> is the date of the dump. For example, the dump of Jan 18, 2010 is named cz_db_dump_1_18_2010.gz. Click on the file you wish to download and a dialog window should appear asking you where to save it. Save it to your home directory (or save it anywhere and copy/move it to your home directory). It may take some time to download the file, since the database dumps are fairly large. For example, the file cz_db_dump_1_18_2010.gz is 174 MB.
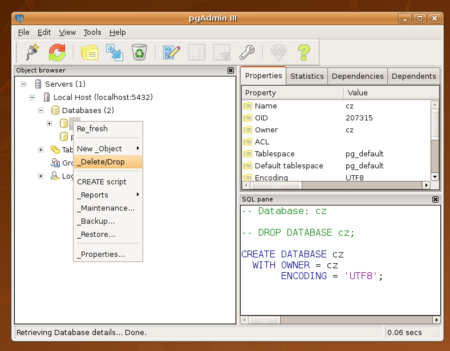
To use the postgres database dump, it is necessary to first re-create the cz database. This is simple. First, delete the current cz database using pgAdmin III. From the main window, place the mouse cursor over the cz icon (you may need to double click the localhost icon to reveal the cz icon). Then right click and select _Delete/Drop (see figure). A window pops up asking you whether you are sure you wish to drop the cz database. Click OK. Now recreate the cz database. In pgAdmin III right click Databases and select New Database. In the name field of the window that appears enter cz and select cz from the drop down menu for the owner. Click OK.
Having re-created the cz database, load the database dump by executing the following command in a terminal window:
gunzip -c cz_db_dump_<date>.gz | psql cz
Of course, you must substitute the date of the dump file for <date>. For example, to load the dump file cz_db_dump_1_18_2010.gz execute:
gunzip -c cz_db_dump_1_18_2010.gz | psql cz
Since you deleted the cz database you created originally, the user name and password for the first user was also deleted. The user name and password for the first user in the postgres dump wiki is "Wikiadmin" and "Wikiadminpw". This user has bureaucrat privileges. You can use the preferences tab to change the password if you wish.
Keeping up to date with CZ wiki changes
Whether you loaded your CZ clone data using importDump.php or using the postgres database dump, the data on your clone will not track the changes made to the Citizendium wiki unless you periodically update it. This is achieved using the CZ daily dump file. You may update your clone's data as frequently or as infrequently as you see fit. In fact, if you set up your clone only as the foundation for a local development environment, you may decide to never update its data. On the other hand, if you set up your clone in order to work on articles when a connection to the internet is unavailable, then you may wish to update your clone's data frequently.
Updating the clone's data uses importDump.php. This utility is designed so it changes only those pages that are out of date. So, if you use it often to update your clone, it's execution time should be reasonable. For example, running on a dual 1.8 GHz processor with 4 MB of memory, importing the daily dump 4 days subsequent to the date of the postgres database dump took about 30 minutes. On the other hand, importing the data from a daily dump made 6 weeks after an initial import took about 10.5 hours. It is up to you to decide the tradeoffs between update frequency and execution time.
To update your clone's data use the instructions given in Loading the clone database from a CZ daily dump file.
